git rm

git rm fileName  

git rm --cached fileName  #폴더 인 경우 -r 혹은 -rf 옵션을 추가  

git rm => 원격 저장소와 로컬 저장소에 있는 파일을 삭제

git rm –cached => 로컬 저장소에 있는 파일은 삭제하지 않고 원격 저장소에 있는 파일만 삭제


사용 예 (안좋은)

.gitignore

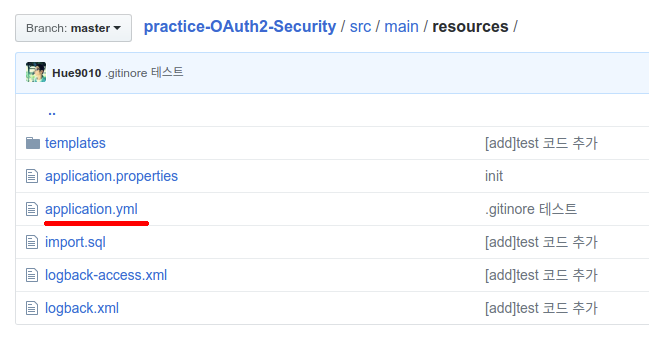
위 처럼 깃 허브에 이미 올라간 application.yml 파일을 지우도록 해 보겠습니다. 안좋은 예라고 한 이유는 아래에 따로 기술 하도록 할 것인데 현재 제가 지우려고 하는 파일과 같은 유형의 파일이 아니라면 알맞은 예가 되긴 할 겁니다.

git rm --cached fileName  
git add fileName  
git commit  
git push   

이와 같이 수행 하면

.gitignore

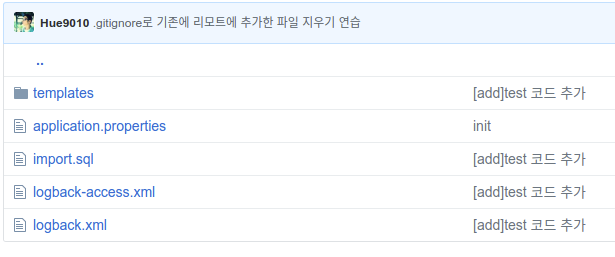
깃 허브 상에서 파일이 사라 진 것을 확인 할 수 있습니다.

.gitignore

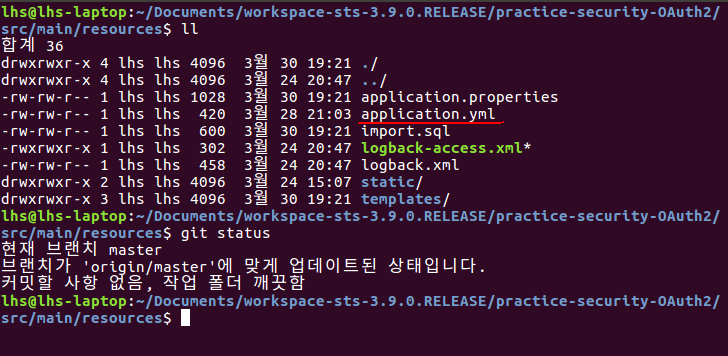
--cached 옵션을 주었기 때문에 로컬에는 파일이 그대로 있습니다.


사실 안좋은 예라고 한 이유는 파일 이름을 보시고 눈치 채신 분들도 있겠지만 오픈된 공간에 공개를 안 하고 싶은 내용이 들어간 파일을 지워보는 연습을 하려고 git -rm을 사용 해 봤는데 당연히

.gitignore

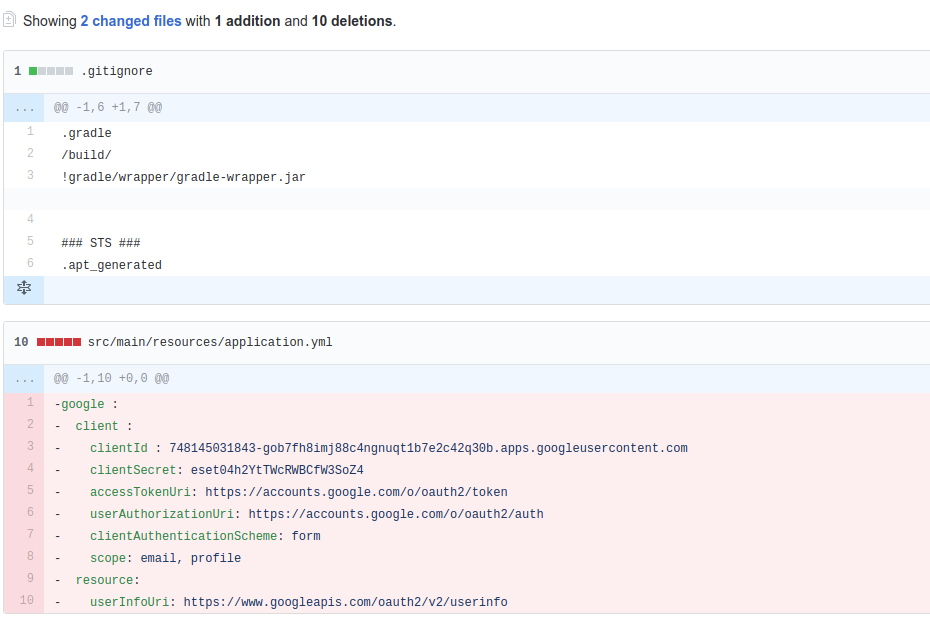
아래처럼 해당 파일에 대한 커밋 이력이 다 남아 있습니다.
일단 예상을 하고 연습용으로 push하고 삭제를 한 부분이라 문제의 소지가 없는 파일을 올린 것이기 때문에 현재 저 같은 경우는 문제 없지만 이미 올라간 내용 자체를 싹다 없애고 싶은 분이라면 다른 방법을 찾아 보실 것을 추천 드립니다.


추가로

.gitinore를 통해서 이미 올라간 파일을 없애고 싶은 경우도 위에 기술 한 방법에서 .gitignore을 갱신한 다음에 git rm --cached 과정을 진행 하시면 됩니다.

LocalDate, LocalDateTime Converter 이용하기

시작하며…

Date 타입에 따라 Converter를 이용하는 방식이 몇가지 있는데 오늘은 Config 클래스를 통해서 Coverter를 사용 하는 방식을 보도록 하겠습니다.

작업 환경

springBootVersion = ‘1.5.9.RELEASE’


Converter 제작

일단 사용 할 Date 타입에 대한 Converter를 만들어 줍니다.

LocalDateConverter

public final class LocalDateConverter implements Converter<String, LocalDate> {

    private final DateTimeFormatter formatter;

    public LocalDateConverter(String dateFormat) {
        this.formatter = DateTimeFormatter.ofPattern(dateFormat);
    }

    @Override
    public LocalDate convert(String source) {
        if (source == null || source.isEmpty()) {
            return null;
        }

        return LocalDate.parse(source, formatter);
    }
}

LocalDateTimeConverter

public final class LocalDateTimeConverter implements Converter<String, LocalDateTime> {

    private final DateTimeFormatter formatter;

    public LocalDateTimeConverter(String dateFormat) {
        this.formatter = DateTimeFormatter.ofPattern(dateFormat);
    }

    @Override
    public LocalDateTime convert(String source) {
        if (source == null || source.isEmpty()) {
            return null;
        }

        return LocalDateTime.parse(source, formatter);
    }
}

LocalDateTime, LocalDate 둘 다 만드는 방식은 같습니다. 예제로 두개 다 제작 했지만 자신이 필요한 타입만 만드셔도 됩니다.


Converter를 Config를 통해 등록

WebMvcConfig

@Configuration
public class WebMvcConfig extends WebMvcConfigurerAdapter {
	@Override
	public void addFormatters(FormatterRegistry registry) {
		registry.addConverter(new LocalDateConverter("yyyy-MM-dd"));
		registry.addConverter(new LocalDateTimeConverter("yyyy-MM-dd'T'HH:mm"));
	}

Config에서 Converter를 등록 할 때 사용된 dateFormat 형식으로 날짜를 받아 오게 됩니다. 그렇기 때문에 자신이 사용 하려는 날짜 형식을 고려해서 작성 하셔야 합니다.

yyyy-MM-dd’T’HH:mm -> 2018-04-03T12:12
yyyy-MM-dd’‘T’‘HH : mm : ss.SSSX -> 2018-04-03T14:18:13.105+01:00
yyyy-MM-dd HH.mm -> 2018-04-03 13.44
yyyy-MM-dd -> 2018-04-03

한가지 주의하셔야 할 것은 YYYY와 yyyy는 다른 결과를 나타낼 수 있습니다. 일반적이라면 yyyy를 사용하시는걸 추천드립니다.(참고1, 참고2)

각 알파벳의 의미(영어)

더 많은 패턴 유형(한글)

참고로 패턴이 다른 형식으로 입력이 들어오면 정상 작동하지 않습니다.


테스트 코드 작성시

@Test
public void createMilestone() {
	String subject = "mysubject";
	HttpEntity<MultiValueMap<String, Object>> request = HtmlFormDataBuilder.urlEncodedForm()
			.addParameter("subject", subject)
			.addParameter("startDate", "2018-04-02T10:10")
			.addParameter("endDate", "2018-04-11T12:12").build();

	ResponseEntity<String> response =
			basicAuthTemplate(findDefaultUser()).postForEntity("/milestones", request, String.class);

	assertThat(response.getStatusCode(), is(HttpStatus.FOUND));
	assertThat(milestoneRepository.findBySubject(subject).get().getSubject(), is(subject));
	assertThat(response.getHeaders().getLocation().getPath(), is("/milestones/list"));
}

Milestone의 필드는 아래와 같고, Post 방식을 이용하여 Milestone 생성을 요청 합니다.

public class Milestone extends AbstractEntity {
	private String subject;

	private LocalDateTime startDate;

	private LocalDateTime endDate;
}

사실 날짜만 있는게 아니라 조금 복잡해 보일 수도 있지만…파라미터로 Date를 추가하는 방식이 몇가지 있지만 보여 드리고 싶었던 부분은 저렇게 String 형태로 작성해도 정상적으로 작동 합니다.

원격 저장소

원격 저장소에 브랜치 생성

git push origin 브랜치 이름

원격 저장소에 브랜치 삭제

git push origin :브랜치 이름

추가로 로컬에서 삭제

삭제 할 브랜치 외의 브랜치로 이동

git checkout 브랜치 이름

로컬 브랜치 삭제

git branch -D 브랜치 이름

압축 (compression) – 7

인프런의 영리한 프로그래밍을 위한 알고리즘 강좌를 보고 작성한 문서입니다.


디코딩하기

class HuffmanDecoder

public class HuffmanDecoder {
  static public void main(String args[]) {
    String fileName = "";
    HuffmanCoding app = new HuffmanCoding();
    RandomAccessFile fIn;
    Scanner kb = new Scanner(System.in);
    try {
      System.out.print("Enter a file name : ");
      fileName = kb.next();
      fIn = new RandomAccessFile(fileName, "r");
      app.decompressFile(fileNAme, fIn);
      fIn.close();
    } catch (IOException io ) {
      System.err.println("Cannot open " + fileName);
    }
  }
}

decompressFile

public void decompressFile(String inFileName, RandomAccessFile fIn) throws IOException {
  String outFileName = new String(inFileName + ".dec");
  RandomAccessFile fOut = new RandomAccessFile(outFileName, "rw");
  inputFrequencies(fIn);
  createHuffmanTree();
  assignCodewords(theRoot, 0, 0);
  decode(fIn, fOut);
}

inputFrequencies

private void inputFrequencies(RandomAccessFile fIn) throws IOException {
  int dataIndex = fIn.readLong();
  runs.ensureCapacity(dataIndex);
  for ( int j = 0; j < dataIndex; j++){
    Run r = new Run();
    r.symbol = (byte) fIn.read();
    r.runLen = fIn.readInt();
    r.freq = fIn.readInt();
    runs.add(r);
  }
}
Spring Boot 2.x 버전에서 OAuth2가 안될때

Spring Boot 2.x 그리고 OAuth2

혹시 OAuth2 예제들을 따라하다 남들이 사용한 클래스와 애노테이션을 이용 할때 분명히 똑같이 따라 했는데 안되는 경우가 있을 겁니다. 그런 경우 자신의 스프링 부트 버전이 몇 버전인지 확인을 해 보시기 바랍니다.

만약 2.x 버전에 OAuth2 의존성을 아래와 같이 한다면 진행이 안되는 막막함을 느낄 겁니다.

dependencies {
	compile('org.springframework.security.oauth:spring-security-oauth2')
}

이유는 다른게 아니라 스프링 부트 2.x 버전대에서 변화가 생겨서 그런겁니다. 그것도 무려 2017년 10월 경에 말이죠. 그래서 아직 해당 자료는 많지 않은 경향이 있네요.

최근 우여곡적을 겪으며 해결을 했는데 허무할 정도로 쉬워서 혹시나 같은 문제를 겪는 분들이 있으면 아래를 참조 바랍니다. 일단 무시무시한 변화가 발생한 릴리즈 노트를 보면서 시작하죠!

Spring Boot 2.0.0 M5 Release Notes

OAuth 2.0 Support Functionality from the Spring Security OAuth project is being migrated to core Spring Security. OAuth 2.0 client support has already been added and additional features will be migrated in due course.

If you depend on Spring Security OAuth features that have not yet been migrated you will need to add org.springframework.security.oauth:spring-security-oauth2 and configure things manually. If you only need OAuth 2.0 client support you can use the auto-configuration provided by Spring Boot 2.0. We’re also continuing to support Spring Boot 1.5 so older applications can continue to use that until an upgrade path is provided. (출처)

결론만 말하자면 Spring Security OAuth 프로젝트의 기능들이 일부 Spring Security로 마이그레이션 되는 중이라 스프링 부트 2.x 버전에서는 기존에 OAuth 프로젝트로는 지원이 안되는 기능들이 생겼다는 것 입니다.

일단 UserInfoTokenServices, ResourceServerProperties 클래스와 @EnableOAuth2Client, @EnableOAuth2Sso 애노테이션이 대표적입니다. 주로 OAuth2를 실습 해보려고 찾아보면 구현되어 있는 예제들이 저 클래스들과 애노테이션을 사용하기 때문에 진행이 막혀 버립니다.

가장 간단한 방법 중 하나는 스프링 부트를 1.x 버전대로 바꾸고 새로 시작하면 되지만 일부 프로젝트가 진행 된 상태면 그러기 쉽지 않습니다.

해결방법은 생각보다 간단 합니다!! 아래를 보죠.


OAuth2 Autoconfig

If you have spring-security-oauth2 on your classpath you can take advantage of some auto-configuration to make it easy to set up Authorization or Resource Server. For full details, see the Spring Security OAuth 2 Developers Guide.

This project is a port of the Spring Security OAuth support that came with Spring Boot 1.x. Support was removed in favor of Spring Security 5’s first class OAuth support. To ease migration, this project exists as a bridge between the old Spring Security OAuth support and Spring Boot 2.x. (출처)

이것도 결론만 말하자면 2.x 버전과 1.x 버전의 호환성을 위한 것 입니다.

많은 예제들을 보면

dependencies {
	compile('org.springframework.security.oauth:spring-security-oauth2')
}

해당 디펜덴시를 추가하는데 oauth:spring-security-oauth2 말고

repositories {
	mavenCentral()
	//If you are using a SNAPSHOT version
  maven { url 'https://repo.spring.io/snapshot' }
	//If you are using a milestone or release candidate version
	//현재는 SNAPSHOT 버전이기 때문에 필요 없습니다.
	//maven { url 'https://repo.spring.io/milestone' }
}

dependencies {
	compile 'org.springframework.security.oauth.boot:spring-security-oauth2-autoconfigure:2.0.1.BUILD-SNAPSHOT'
}

이렇게 추가하면 2.x 에서도 1.x에서 만들어 둔 것들이 아무 문제 없이 돌아 갑니다.

이유는 위에서 말씀 드린 것 처럼 1.x대와의 호환성을 위해 만들어진 것이기 때문입니다.

그러나 어디까지나 이건 이전 버전대의 방식을 이용하기 위한 방법이고 가장 좋은 방법은 2.x에서 사용하는 방법을 학습 하는 것이겠지만, 아직은 자료가 많지 않고 스프링, 스프링 시큐리티와 OAuth2에 대한 이해도가 높지 않아 정확히 파악하진 못한 관계로 나중에 좀 더 근본적인 해결 방법을 알게 되면 포스팅 하도록 하겠습니다.


추가로

spring-cloud-security를 이용해도 됩니다.

repositories {
	mavenCentral()
	//아래 버전의 경우
	maven { url "https://repo.spring.io/milestone" }
}
dependencies {
compile 'org.springframework.cloud:spring-cloud-security:2.0.0.M3'
}

+ 저 같은 경우는 그레이들로 작업을 해서 그레이들 dependencies만 작성을 하였는데 혹시 아직 메이븐이 익숙치 않아 어려움이 있는 분이 있어 알려주시면 추가하도록 하겠습니다.